how to create a hand-wired bouquet

During Longwood’s Comprehensive Wedding Design class we made boutonnieres, corsages, and flower girl pomanders…but it was the bouquets, oh the bouquets, that were the best and most rewarding to create.  I’ve made my fair share of bouquets of course, but had never learned to do a hand-wired one.   The hand-wiring technique is the “gold standard” for creating a bridal bouquet, according to teacher Nancy Gingrich Shenk, an old pro in the wedding biz.  Hand wiring the stem of each flower allows you almost perfect control over stem placement and makes the bouquet lighter and easier to handle.  Creating a symmetrical and rounded bouquet is that much simpler using this technique.  I found myself enjoying this new skill and the resulting design very much!

the lovely juliet with hand wired bouquet

the lovely Juliet models my hand wired bouquet- isn’t she a gorgeous bride?

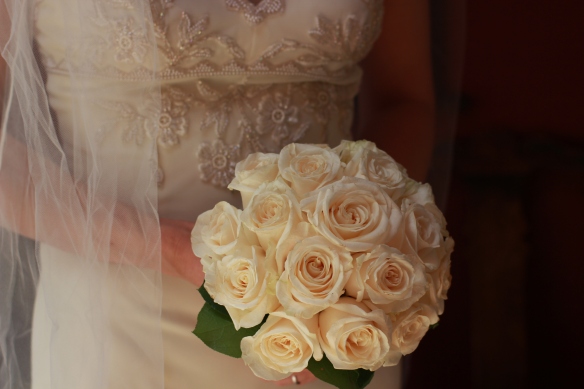
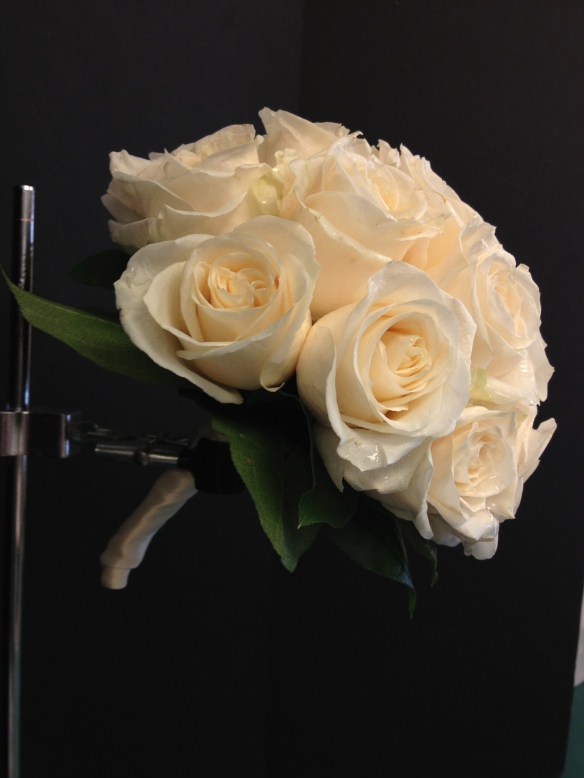
My 'gold standard' hand-wired bouquet with cream roses at the peak of their perfection

My ‘gold standard’ hand-wired bouquet with cream colored roses at the peak of their perfection

To create a hand-wired bouquet like the one above, start with the proper materials and tools, including wire, floral tape, about 20 roses, some lemon leaf or other foliage, ribbon and pins (for the handle,) pruners or snips, wire cutters and scissors.

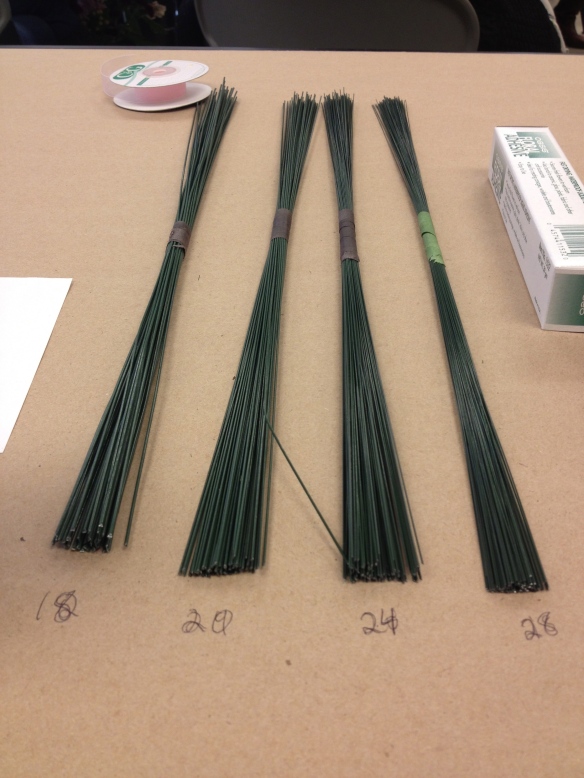
18-28 gauge wire, 18 is the largest diameter, 28 the smallest.  24 is the workhorse in floral design

18-28 gauge wire, 18 is the largest diameter, 28 the smallest. 24 is the workhorse in floral design

The correct gauge wire to use is heavy enough to replace the natural stem and hold the head upright, but not too heavy to add extra weight to the finished design.  (So as you do your wiring, hold the flower just by the wire, and if the whole thing falls over, your wire is too light!) 24 gauge is the “workhorse” in floral design, but for this bouquet I used 20 gauge, just a little thicker.

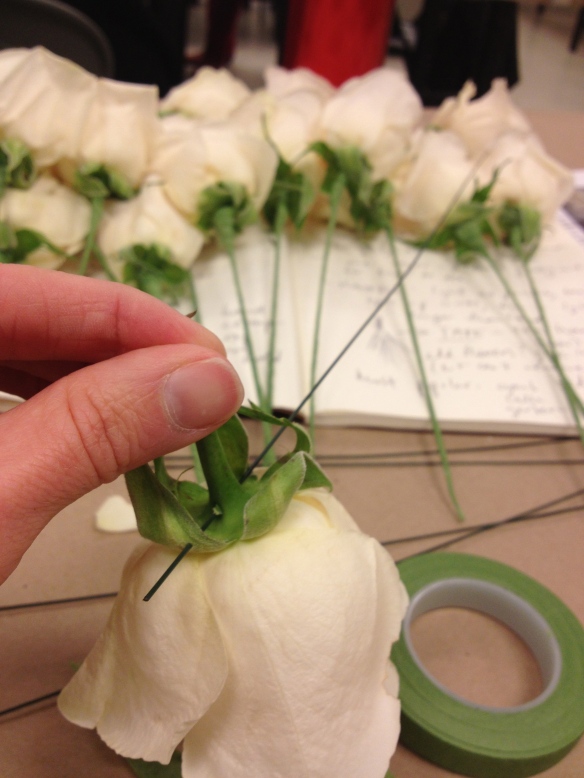
Pass the wire through the calyx, fold over and wrap in floral tape

Pass the wire through the calyx, fold over and wrap in floral tape

To wire a flower, start by breaking off it’s stem, leaving only on inch.  Insert the wire through the flower’s calyx, the green bulbous part that meets the bottom of the flower, pull the wire through a bit, and then fold it over.  Then wrap the whole new wired stem in light green floral tape.  (Take the end of the floral tape in your left hand, attach it to the top of the stem and wind it down on a diagonal with your right hand. Floral tape is not sticky on it’s own, but it sticks to itself when pressure is applied.)  During the wiring/taping process, be careful to handle the actual flower as little as possible to avoid bruising. TIP: White flowers bruise more easily

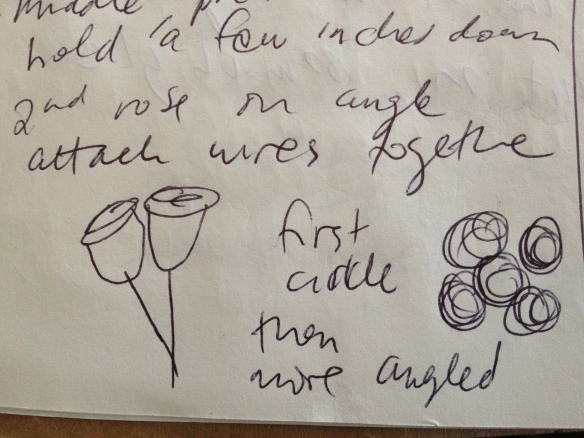
notes on angling stems

Wiring and taping is a laborious and time consuming process, but it makes the next step easier.  Select your most beautiful flower – this will be at the very center of your bouquet.  Hold it by the stem a few inches down, and so the flower is facing the ceiling.  Take your second flower and angle it’s face towards the wall, snugging it up against the first flower.  Bend the wires so they are both in the same line, pinched together by your fingers a few inches down from the calyxes.  Then turn the whole thing (I went clockwise,) put your third flower on an angle facing the wall again, bend the wire, turn again.  Do this until you have that first circle of flowers around flower number one.
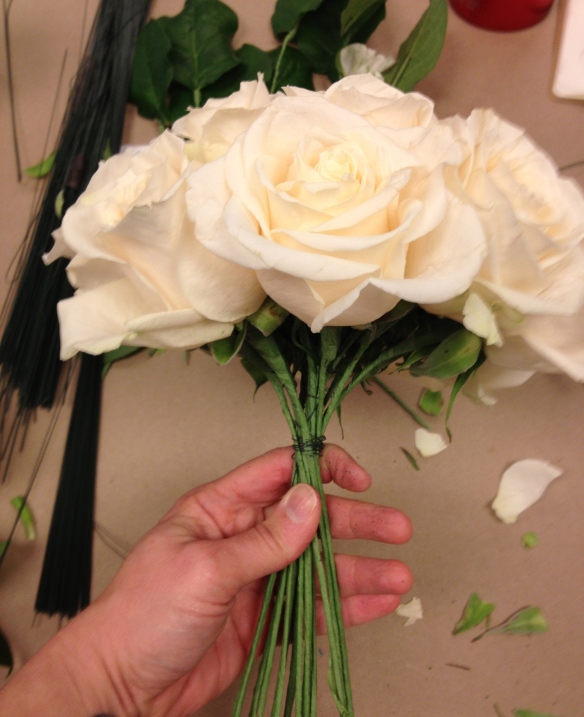
Place each stem at an angle to the center flower and turn.  Wire as you go to give your hand a break.

Place each stem at an angle to the center flower and turn. Wire as you go to give your hand a break.

If your hand is tired, wrap the stems with wire at the pinch point.  The next set of flowers will be even more angled away from flower number one, so that if you left them when placed, the wire stems would almost be perpendicular to flower number one.  But you are tucking each wire stem straight down to be with the rest of the bunch.  As you place flowers, you can use a mirror to make sure your bouquet is symmetrical.  It’s important to remember that this bouquet must look good from every angle!

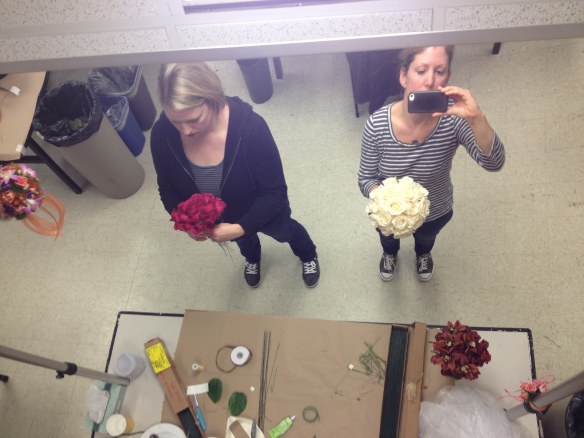
Here a fellow classmate and I check to see if our bouquets are symmetrical in the mirror

Here a fellow classmate and I check to see if our bouquets are symmetrical in the mirror

After you’ve secured your wires together with another wire, add some wired and taped lemon leaf to the bottom of the bouquet.  One layer of leaves will be ‘shiny side up’ so that it looks good from above, and the next layer will be ‘shiny side down’ so that the bride sees the prettiest part as she holds the back of the bouquet.  Then, cut out some of the tape-covered wires with your wirecutters.  This will minimize the weight of the finished design.  Wrap the whole thing in another layer of floral tape, add a ribbon and pins and voila!
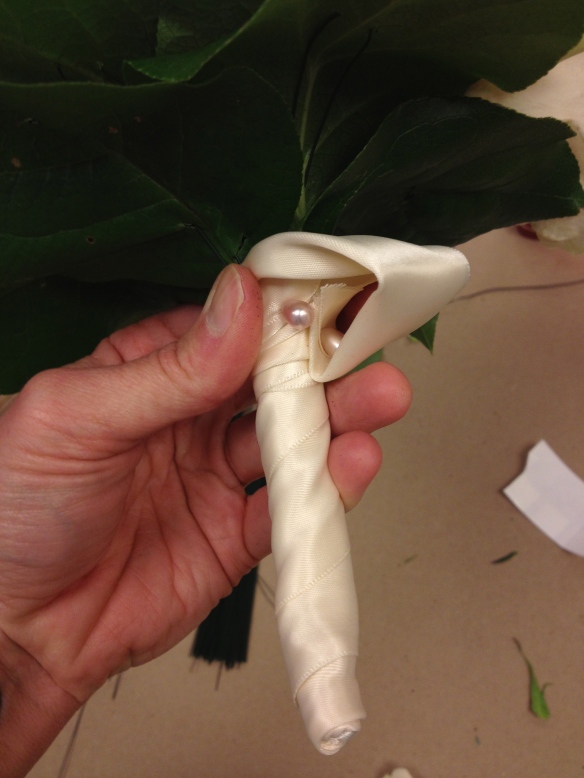
Add a layer of leaves and a pretty ribbon to finish off the underside of the bouquet.

Add a layer of leaves and a pretty ribbon to finish off the underside of the bouquet.  The “thumbholder” here is for the bride to tuck her ‘something old’ hankie into!

My hand wired bouquet displayed in an old chemistry holder to see the form

My hand wired bouquet displayed in an old chemistry holder to see the form

Some of the other students in the class made excellent bouquets.  I regret not having taken more pictures!
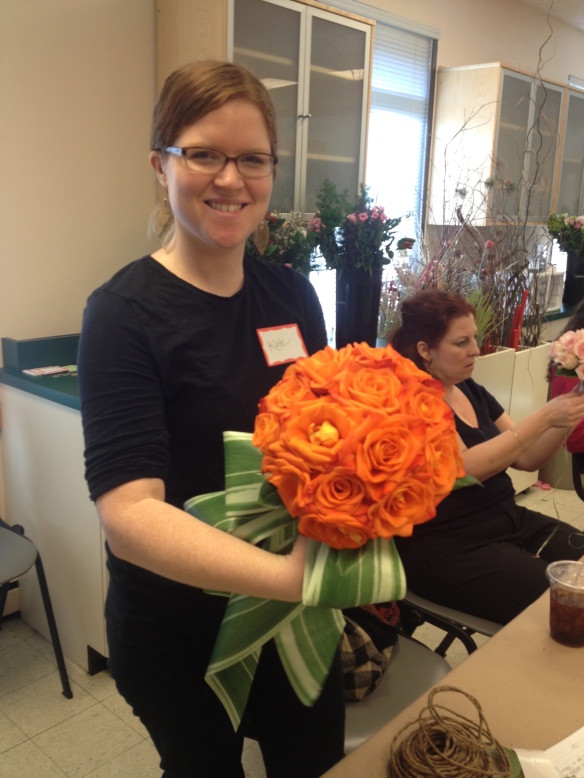
Kate's bouquet was bold and modern with a touch of a garden feel

Kate’s bouquet was bold and modern with a touch of a garden feel

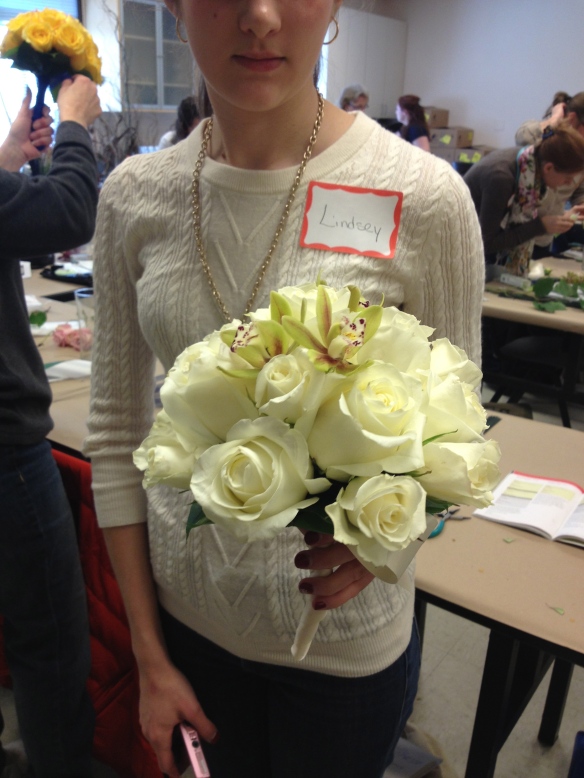
Lindsey tucked a few cymbidium orchids into her bouquet.  Her roses were of different sizes, creating a romantic 'fresh from the garden' feel.

Lindsey tucked a few cymbidium orchids into her bouquet. Her roses were of different sizes, creating a romantic ‘fresh from the garden’ feel.

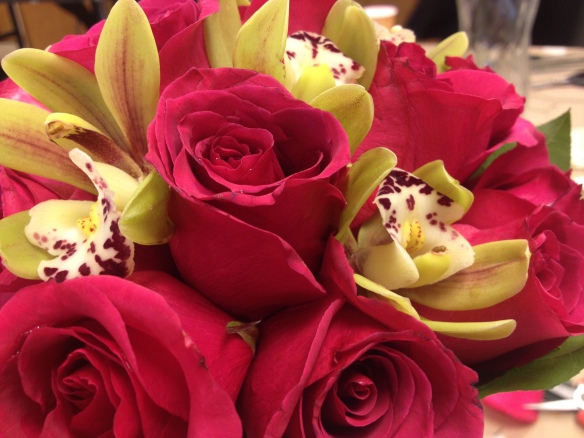
Fuschia roses combined with chartreuse cymbidium orchids - wild and modern!

Fuschia roses combined with chartreuse cymbidium orchids – wild and modern!

There was so much presented in this course, I couldn’t possibly cover it in one blog post.  All in all it was one of the best courses I’ve had at Longwood, infused with the personality of our teacher, who really has “seen it all” when it comes to the wedding business.  She told us countless stories of brides and their families gone wild, and when we got into discussing the business side of things, revealed that when she worked with some particularly difficult clients, she slapped on a “10% Bitch Charge” to the bill!

Coming up soon- hand tied and cascading bouquets!

day one – advanced floral design I at longwood

I was on the waiting list for this class, and at the last minute I got in! It’s a Saturday class that meets from 9-4, an all day affair, and was actually a bit intense, because we squeeze two classes into one day. The teacher is the same as my Basic class, Jane Godshalk, thankfully, but there were only a few students that I recognized. The rest seemed to be on some other plane of advanced floral design! I felt as if I were coming from the minor leagues to the big time, looking around at all the creative touches I never would have thought of going on around me. Jane kept saying, “you’re in Advanced now, people…”

Instructor Jane Godshalk's Linear Design

We started by discussing Linear Qualities in Design. Line can be static or dynamic; there are both primary and secondary lines. Here are some of the many line types:

Linear Qualities in Design

In a Linear Design the line is dominant – the negative space powerful. The lines can become a geometric form – circle, square, triangle and every combination of those forms.

All geometric shapes are some variation of circle, square or triangle (the fundamental forms of nature)

There are a few really important ideas to consider when conceiving of a design plan: the vertical axis, which may be visible or invisible in the design; the binding point (the central binding point) and the point of emergence (the point from which lines of a design begin, also usually the binding point. confusing.)

think about the vertical axis and binding point!

Also, consider the focal point or focal area – this is the area of greatest impact in a design – to which the eye is naturally drawn. It’s usually close to the binding point. There are many ways to achieve focal interest:

  1. Color – darker flowers have more visual weight than lighter colors
  2. Size – larger, more open blooms have more visual weight
  3. Shape and Pattern – form flowers have greater interest
  4. Spacing – closer spacing makes flower appear heavier
  5. Texture – contrasting textures create visual interest – Shiny foliage is focal
  6. Line Direction – radiating lines attract interest to center of design

Here are some basic flower arrangement designs. This gets you thinking that there’s no end to what you could do!

This morning we do two linear designs. Jane recommends really planning out your design – choosing your style (decorative, vegetative, form+ line, abstract,) choosing the dominant element, flower forms, color palette, and planning your vertical axis. Make a sketch before you begin! The first design we do will have a visible axis and will incorporate some techniques from Basic like pave and terracing.

my sketch, vertical axis will be off to the left. all i know at this point is that snapdragons will be my line flower and a lily will be the form flower and focal point.

My linear design with visible axis. Jane had to help me remember about point of emergence!

another student's linear design with visible axis

Moving on, we are to create Design 2 – a Linear design with an invisible/imaginary axis. We have a nice white Ikea vase to play with. Again, we make a sketch and plan all the elements: dominant element, flower forms, palette, and where is the imaginary vertical axis. All I know is, I’m using those Bells of Ireland (I will have to wire them to make them the shape I want) and green mums, and my imaginary axis will be in the center. I want to do something curvy.

my sketch for design #2

My linear design with imaginary axis - Jane says "it's almost a Hogarth Curve!" I think the imaginary axis ended up being slightly left of center.

After lunch break, it’s time to tackle the Phoenix Design, for which we’ve brought containers from home. I was lent a beautiful silver Revere bowl by Juliet. The Phoenix Design, interestingly, is the only design we’ll be learning that is attributed to American designers. And yes, it is inspired by the mythological bird that cyclically sets itself on fire and rises from it’s own ashes to begin another long life. So the design is all about renewal and rebirth.

Phoenix depicted in the book of mythological creatures by F.J. Bertuch (1747-1822)

The Phoenix design is a composition in which tall materials burst from the center of a round arrangement in a radial fashion with a triangular shape.

slideshow - one of Jane's Phoenix designs she created for a party

Our mechanics for this arrangement, which is great for big parties, begin with a block of soaked Grande oasis put into a liner and then into the container. Others had varying shaped containers and needed to secure the foam with chicken wire and tape – mine was steady so I didn’t need to do that. Start by grouping various foliage at the base, leaving a hole in the center for the fireworks. Remember the base is to be a round shape. We used Ruscus, Ming Fern, and Apidistra leaf (Jane’s fave,) which she showed us how to bend in on itself, and poke the stem through the leaf to create a bulkier shape. Then put in your line flowers, in this case Gladiolas, using radial lines. These tall line flowers should create an upside down triangle from all sides (easier said than done!)

Jane demonstrates the Phoenix design

We did create a sketch first but I think you get the picture here. After a mad rush to get our flowers, we spend an hour or so making this one. The person next to me seems to require a lot of space so I move to the counter space behind me – it’s really hard to see your line and form with so much happening visually in the room. After putting in the line flowers, we fill in the rounded form at the base with roses, alstromeria, carnation, waxflower, etc. I end up using more roses instead of carnations, because there are some left over. In these classes, you try to play by the rules regarding how much plant material you’re allowed, but if you pay attention you can often grab some extras after everyone has taken what they need.

Sisters with their Phoenix designs

my phoenix design with a few extra glads and roses thanks to jane

In choosing the colors, I started with the green glads and wanted pink roses to complement them, especially because the intended location for this guy was June’s house (June is 2) and her favorite color is pink. I accidentally cut my glads too short and ended up putting a bunch of myrtle in to compensate – which during our evaluation in front of class, Jane took out, leaving just the curly willow. I’m glad she did this, I think in Basic she doesn’t critique our designs quite as much but how are you going to learn, right? Anyway, this design is very big and didn’t end up fitting at the intended location! So it’s up at the ‘big house’ lasting quite well though because of it’s size it’s a bit thirstier than other arrangements I’ve made.

my Phoenix design in a home setting


After a long day in Advanced I’m pretty fried- in a good way. I made it!

the Valentine’s day haze of 2012

I close my eyes and see…flowers.  Soft pink tulips tinged with veins of green, the cheery pom-poms of chartreuse snowball viburnums, light lavender sweet peas so papery thin, luscious flesh-colored stock that exudes a sweet-spicy scent, a stab of bright blue-purple delphinium, and roses upon roses…roses the color of a wild sunset or a rosy tangerine, roses the color of peaches edged with soft green, lipstick red roses, and Deja Vu roses standing at attention on their 3-ft long stems, a clear concise yellow that says, Hello You.

check out the scabiosa seedpod amidst the garden roses, tulips, viburnum, and rice flower

peachy green roses, astrantia, calla lily, viburnum, seeded eucalyptus mmm

Yesterday turned out to be one of my favorite days of all time, and I’m not much into Valentine’s Day.  Well that was BF…Before Flowers.  I went into the shop on Monday to help prep the roses (oh yeah, like 700 of them!) and to get some bouquet-making lessons from my beautiful boss lady Peicha.  I left with a price list to study and a sour ball of nervousness percolating in my stomach.  Would I be able to arrange quickly and confidently and add up prices in my head at the same time?  Would I choose the right “color stories?”  Would the stress of a lot of retail interaction be too much for me?  (The needy masses hungry for brilliant arrangements queuing up to watch me fail.)

wake up and smell the roses!

Valentine’s Day 2012 arrived with the Tarot Card of Death in an email. I don’t know why I subject myself to these emails that are supposed to tell me how my day will go.  Like somehow getting the Knave of Wands randomly generated  by a computer means I’ll have an adventurous day.  But the Death Card…uh oh…how is that interpreted at 7am? Maybe I’ll impale myself with a rose and die…or get in a car accident on that Big Road called City Ave…or simply die of shame.  I dressed in what my brother calls my ‘riding boots’ and a bright red blazer (Anthro of course) and hoped that this geranium red would give me some kind of confidence.

smooches from emily!


When I arrived the ladies were in full swing, in fact Peicha had been there since the crack of the ass of dawn, making the pre-ordered bouquets and arrangements (in vases.) She was feeling ‘ahead of the game.’  Dear Emily, an ever-bubbling font of positivity, set our mood to Happy.  Go Team Falls Flowers! Give me an R…O…S…E!  We set into motion together, taking orders from customers, creating bouquets, answering the phone, tying ribbons around the pink tissue that gets wrapped around all the bouquets, and saying “Here you go.  These are your flowers, your Valentine will be so pleased.”

flesh pink stock, rice flower, beigey garden rose, viburnum, lisianthus

Earlier in the day, I took a phone order from a gent who was on business out West.  He and his family live right down the street from Falls Flowers.  He was scared he wasn’t going to get his order in on time, and wanted 4 arrangements (in vases): 2 for his little girls, one for his wife, and one for his mom.  AW.  Peicha let me choose all the flowers for these, and I had a ball doing it.

3 vday arrangements for lucky ladies down the block


grandma's arrangement: tangerine roses, hot pink hyacinth, brunia, waxflower, hypericum berry, frilly orange tulips

And at the end of the day, after all the madness and yes, making a few mistakes here and there and having to use a calculator as I chose blooms, I got to deliver the 4 completed arrangements with Peicha’s husband Mark, who god love him was out all day delivering our product all over tarnation.  The door opens, and a little girl holding a Hello Kitty doll answers.  There we are, with flowers popping out of our heads, what must we look like to her? Her face lights up.  Delivery for Lila! I say.  Mom/Wife comes to the door to see what the ruckus is.  HER face lights up.  We enter, placing the arrangements around the room, and Grandmom/Mom sees the goods and HER face lights up.   I say that Dave/Daddy wanted all of his Valentines to have a very special day and that’s why we made each of you your own special arrangement.  Shock and awe.  This guy just racked up points that will last him all year.  As we’re leaving, little Lila says, “Hello Kitty says Goodbye!” And that’s the end of Valentine’s Day.

me with RED ROSES mixed with waxflower bouquet...POW! photo courtesy FF and emily

Or is it?  After spending the day in nonstop motion, working in tandem with 2 very talented and delightful creatures, and using my head heart and hands, I feel fulfilled on so many levels.  But a little sad, because where is MY Valentine?  Who loves ME enough to give me flowers? When I get home (well my parent’s house because that’s where I’m staying right now) my 2-yr old niece is there for dinner.  She is all smiles, sitting in her big girl chair and gobbling up her dinner.  We jokingly eat each leaf of the salad separately pretending to be Peter Rabbit.  Fun.  And after dinner, a very special surprise for Auntie Ann.  My very own Valentine with dragonflies, frogs, caterpillars and lady bugs made especially for me by niece.  She gives me big hugs and giggly Eskimo kisses to top it all off.  L…O…V…E!

the meaning of floral design?

roses in for VDAY at falls flowers shop

“In floral design, there is no better teacher than the flower itself.  This is the essential maxim.  In a flower’s perfection, we instinctively recognize the infinite creativity and wisdom of nature.  By looking closely at each flower, we take the first step in discovering how best to display its beauty, arrange its placement, and find possible companions in a floral design.” – Alisa A. de Jong-Stout, in A Master Guide to The Art of Floral Design, a book I checked out of the Swarthmore library.  The book our Longwood teacher recommends is $180…so, I think I’ll wait on that one.

helleborus 'snow bunting' at scott arboretum mmmmmmm

I think in picking up this book, I was hoping to get some answers on what floral design really means.  I want it to be meaningful.  I think I struggle with its meaning somewhat because I know plants better as they are growing, alive, with roots in the ground.  For me, plants/flowers take on an almost spiritual cast while in their natural state – they are to be observed, identified and photographed, in a worshipful way.  Before I read this book and started this learning program, I had this somewhat disdainful view of the floral industry – that floral design is just nature’s wannabe imitation, that making bouquets is sort of cheating when the real work is in growing things.  But now I think I feel differently – we can learn from the flower whether it’s in the ground or in the vase – marvel at its patterns and form and color.  You can respect the biological side of things and at the same time appreciate the art of the flower while its in a jar.   And I’m loving the artiness of it all!  Because, you know, according to Ms. de Jong-Stout, “cutting a flower outdoors to display indoors was conceivably the first and most basic of all artistic impulses.”

parrot tulips

“Abstraction is the defining quality of floral design.  Even botanical compositions, which emphasize the specific identities of the plant material involved, contain an element of abstraction. Simply taking a bloom out of its original environment dilutes its botanical purity, which is why a floral design can never completely duplicate nature. As abstraction increases, inherent qualities of shape, form, or color, independent of floral identity come forward.  Yet a design can never be purely abstract because its foundation is a living flower.  …Success can only come to those who take the time to read the flower and benefit from its incredible wisdom in design.  Respect for the natural essence and character of our medium assures its identity will be preserved, even in abstract compositions.”

bouquet by Peicha

Happy Valentine’s Day!