how to create a hand-wired bouquet

During Longwood’s Comprehensive Wedding Design class we made boutonnieres, corsages, and flower girl pomanders…but it was the bouquets, oh the bouquets, that were the best and most rewarding to create.  I’ve made my fair share of bouquets of course, but had never learned to do a hand-wired one.   The hand-wiring technique is the “gold standard” for creating a bridal bouquet, according to teacher Nancy Gingrich Shenk, an old pro in the wedding biz.  Hand wiring the stem of each flower allows you almost perfect control over stem placement and makes the bouquet lighter and easier to handle.  Creating a symmetrical and rounded bouquet is that much simpler using this technique.  I found myself enjoying this new skill and the resulting design very much!

the lovely juliet with hand wired bouquet

the lovely Juliet models my hand wired bouquet- isn’t she a gorgeous bride?

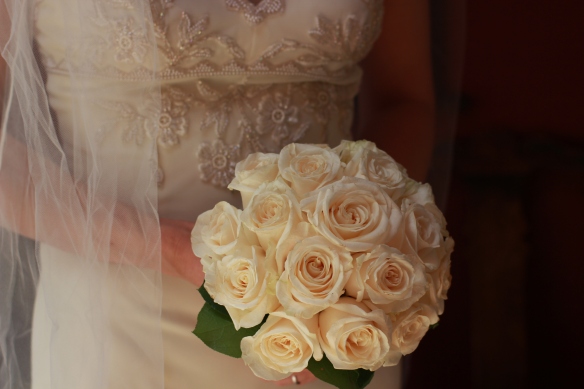
My 'gold standard' hand-wired bouquet with cream roses at the peak of their perfection

My ‘gold standard’ hand-wired bouquet with cream colored roses at the peak of their perfection

To create a hand-wired bouquet like the one above, start with the proper materials and tools, including wire, floral tape, about 20 roses, some lemon leaf or other foliage, ribbon and pins (for the handle,) pruners or snips, wire cutters and scissors.

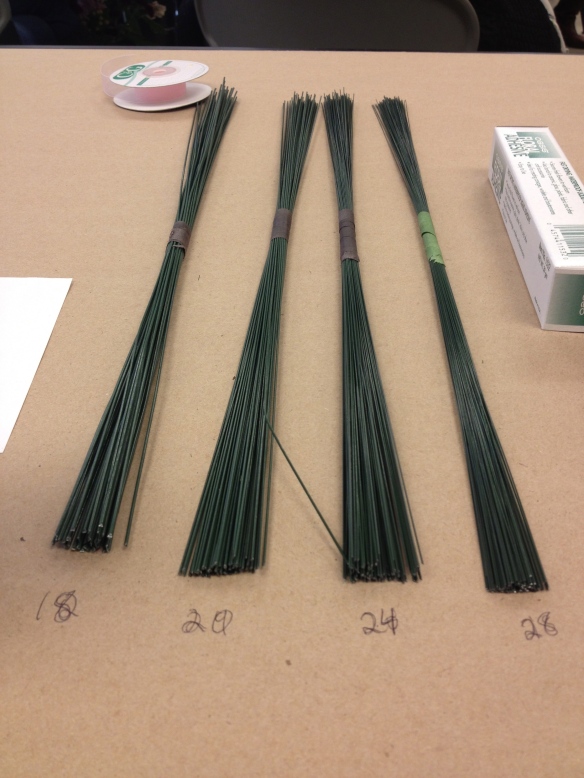
18-28 gauge wire, 18 is the largest diameter, 28 the smallest.  24 is the workhorse in floral design

18-28 gauge wire, 18 is the largest diameter, 28 the smallest. 24 is the workhorse in floral design

The correct gauge wire to use is heavy enough to replace the natural stem and hold the head upright, but not too heavy to add extra weight to the finished design.  (So as you do your wiring, hold the flower just by the wire, and if the whole thing falls over, your wire is too light!) 24 gauge is the “workhorse” in floral design, but for this bouquet I used 20 gauge, just a little thicker.

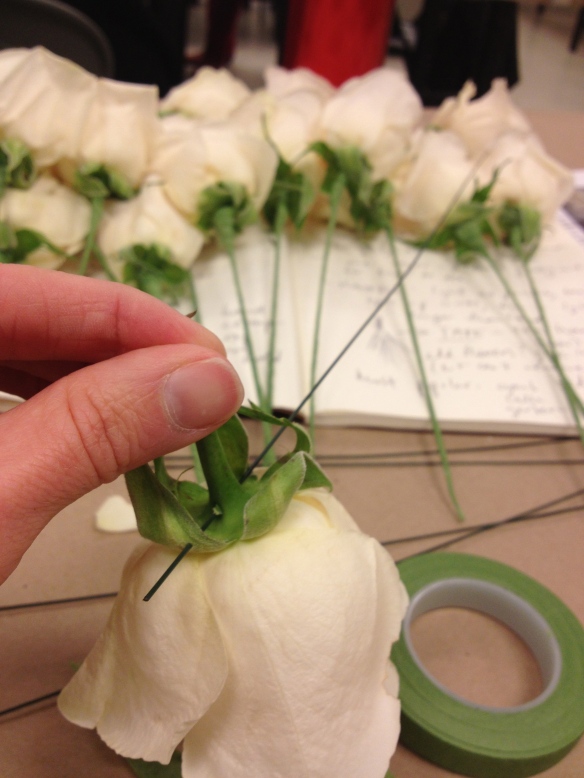
Pass the wire through the calyx, fold over and wrap in floral tape

Pass the wire through the calyx, fold over and wrap in floral tape

To wire a flower, start by breaking off it’s stem, leaving only on inch.  Insert the wire through the flower’s calyx, the green bulbous part that meets the bottom of the flower, pull the wire through a bit, and then fold it over.  Then wrap the whole new wired stem in light green floral tape.  (Take the end of the floral tape in your left hand, attach it to the top of the stem and wind it down on a diagonal with your right hand. Floral tape is not sticky on it’s own, but it sticks to itself when pressure is applied.)  During the wiring/taping process, be careful to handle the actual flower as little as possible to avoid bruising. TIP: White flowers bruise more easily

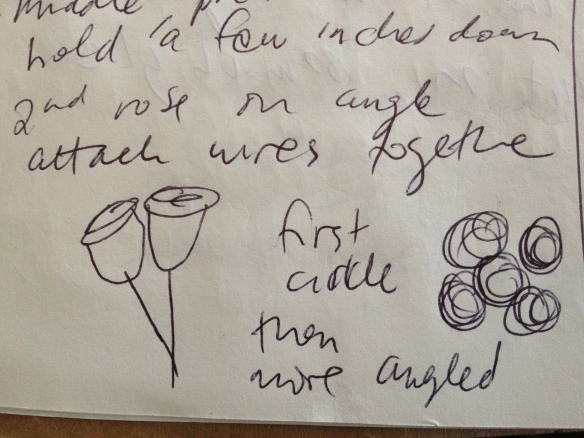
notes on angling stems

Wiring and taping is a laborious and time consuming process, but it makes the next step easier.  Select your most beautiful flower – this will be at the very center of your bouquet.  Hold it by the stem a few inches down, and so the flower is facing the ceiling.  Take your second flower and angle it’s face towards the wall, snugging it up against the first flower.  Bend the wires so they are both in the same line, pinched together by your fingers a few inches down from the calyxes.  Then turn the whole thing (I went clockwise,) put your third flower on an angle facing the wall again, bend the wire, turn again.  Do this until you have that first circle of flowers around flower number one.
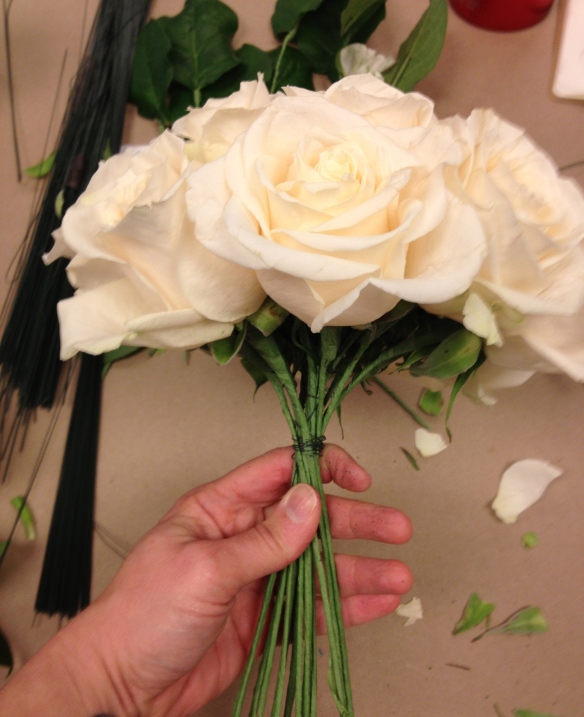
Place each stem at an angle to the center flower and turn.  Wire as you go to give your hand a break.

Place each stem at an angle to the center flower and turn. Wire as you go to give your hand a break.

If your hand is tired, wrap the stems with wire at the pinch point.  The next set of flowers will be even more angled away from flower number one, so that if you left them when placed, the wire stems would almost be perpendicular to flower number one.  But you are tucking each wire stem straight down to be with the rest of the bunch.  As you place flowers, you can use a mirror to make sure your bouquet is symmetrical.  It’s important to remember that this bouquet must look good from every angle!

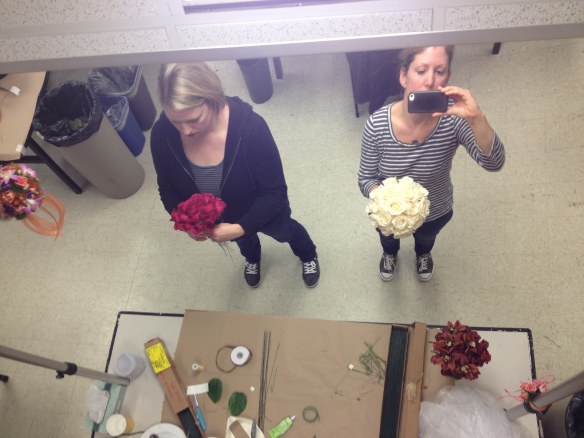
Here a fellow classmate and I check to see if our bouquets are symmetrical in the mirror

Here a fellow classmate and I check to see if our bouquets are symmetrical in the mirror

After you’ve secured your wires together with another wire, add some wired and taped lemon leaf to the bottom of the bouquet.  One layer of leaves will be ‘shiny side up’ so that it looks good from above, and the next layer will be ‘shiny side down’ so that the bride sees the prettiest part as she holds the back of the bouquet.  Then, cut out some of the tape-covered wires with your wirecutters.  This will minimize the weight of the finished design.  Wrap the whole thing in another layer of floral tape, add a ribbon and pins and voila!
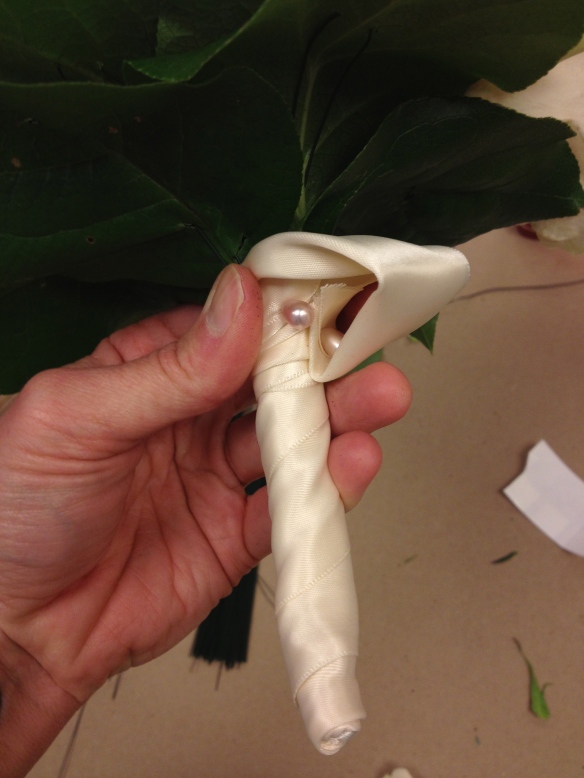
Add a layer of leaves and a pretty ribbon to finish off the underside of the bouquet.

Add a layer of leaves and a pretty ribbon to finish off the underside of the bouquet.  The “thumbholder” here is for the bride to tuck her ‘something old’ hankie into!

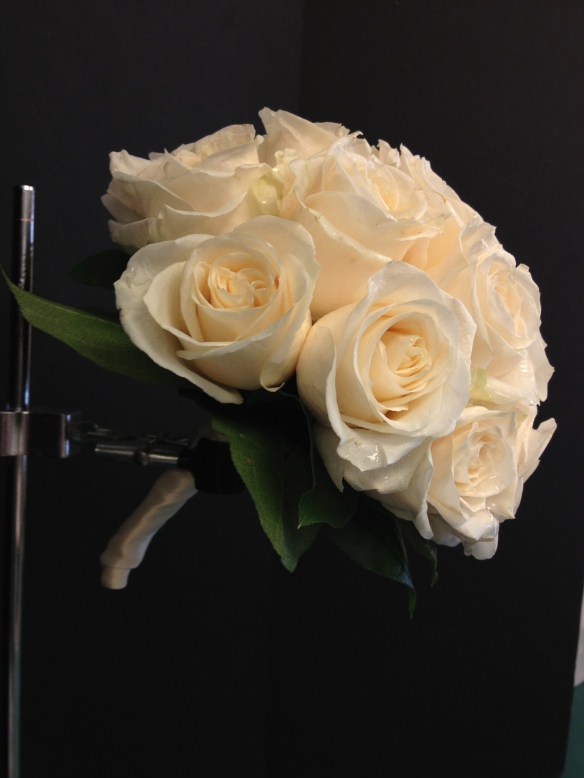
My hand wired bouquet displayed in an old chemistry holder to see the form

My hand wired bouquet displayed in an old chemistry holder to see the form

Some of the other students in the class made excellent bouquets.  I regret not having taken more pictures!
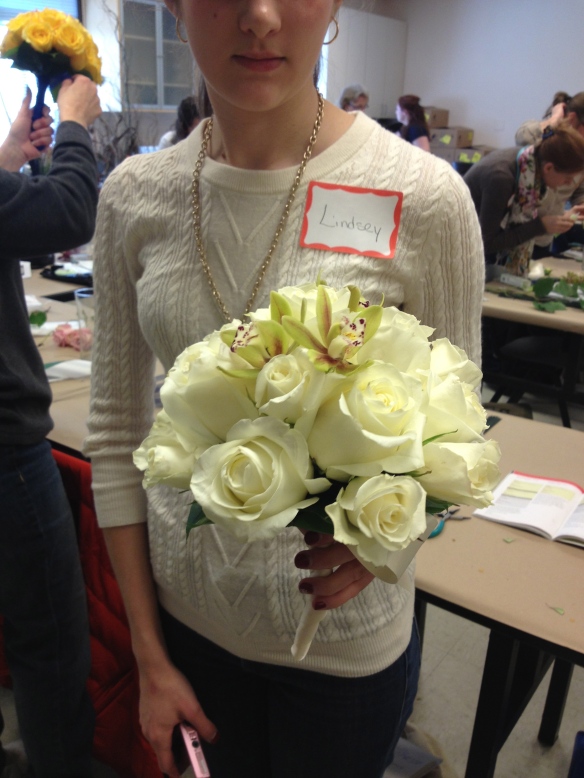
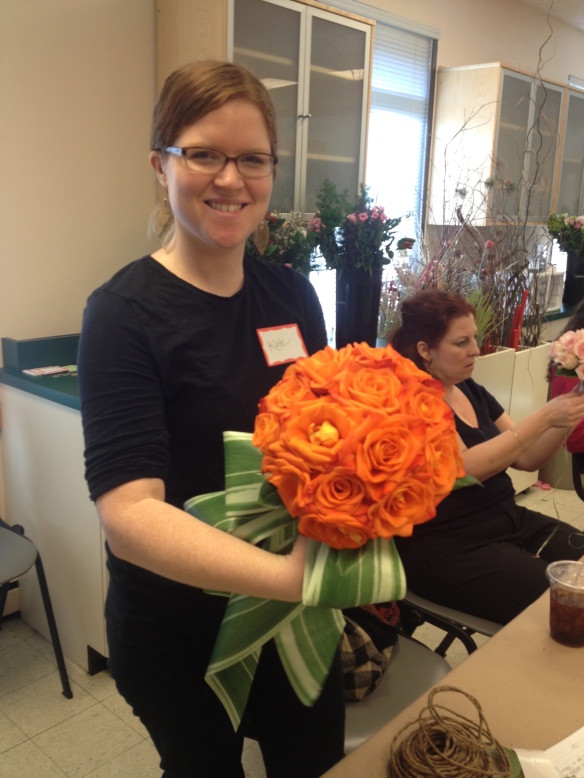
Kate's bouquet was bold and modern with a touch of a garden feel

Kate’s bouquet was bold and modern with a touch of a garden feel

Lindsey tucked a few cymbidium orchids into her bouquet.  Her roses were of different sizes, creating a romantic 'fresh from the garden' feel.

Lindsey tucked a few cymbidium orchids into her bouquet. Her roses were of different sizes, creating a romantic ‘fresh from the garden’ feel.

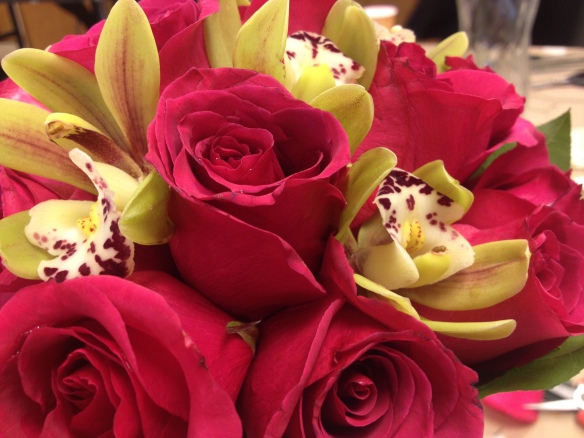
Fuschia roses combined with chartreuse cymbidium orchids - wild and modern!

Fuschia roses combined with chartreuse cymbidium orchids – wild and modern!

There was so much presented in this course, I couldn’t possibly cover it in one blog post.  All in all it was one of the best courses I’ve had at Longwood, infused with the personality of our teacher, who really has “seen it all” when it comes to the wedding business.  She told us countless stories of brides and their families gone wild, and when we got into discussing the business side of things, revealed that when she worked with some particularly difficult clients, she slapped on a “10% Bitch Charge” to the bill!

Coming up soon- hand tied and cascading bouquets!

magic at cairnwood

I spent the day helping Peicha Chang of falls flowers, and my what a lovely day it was.  We set up for a wedding at Cairnwood, a magical place that beckons you to “experience the grandeur of the Gilded Age.”

This country estate in Bryn Athyn, 16 miles from center city Philadelphia, was constructed in 1895 and has been designated a National Historic Landmark.  Looks like a great place to get married!

mason jars filled with blooms cap the end of every other row

rustic chandelier is hung in the gnarled conifer, with roses in place of candles

Inside the estate, we had 14 tables to cover with centerpiece “collections” in three different rooms, a mantle to hang with vintage bottles filled with buds, a cake cupboard to strew with loose flowers, and a greeting table to bedeck with more vintage bottles filled with blooms.  The palette features grays and creams and peachy pinks, which echo the colors in some of the rooms of Cairnwood.

Peicha’s centerpiece collections include the clever use of succulents as table number holders

the mantle, covered with old pictures, is hung with vintage bottles filled with buds

a glimpse of the bride

Juliet roses, peachy stock, white anemones, brunia and succulents on display

I couldn’t help myself, while taking pictures of the bouquets wrapped and ready to go, I had to capture the bridesmaid’s room.  People are so interesting.

bridesmaids getting ready

awaiting fresh cakes

groomsman with boutonniere

I am feeling a little like a maidservant in Downton Abbey at this point, trying to be silent and unobtrusive and graceful.  Peicha infuses the day with positivity and humor.

On our way out, we discover a great photo op…the very gorgeous bride and groom!  Best wishes to you both for a beautiful life together.

Bridal bouquet designed by Peicha

a midsummer’s night wedding

Last week, I met the Nancy Saam flower gang at the Merion Cricket Club in Haverford, PA.  Our mission:  to create a wedding day in the tone of A Midsummer’s Night Dream.  It was to be a whimsical woodland, a graceful garden, and a summery sweet setting; the type of shindig that the Fairy Queen herself would attend.

I know a bank whereon the wild thyme blows,
Where oxlips and the nodding violet grows
Quite over-canopied with luscious woodbine,
With sweet musk-roses, and with eglantine:
There sleeps Titania some time of the night,
Lulled in these flowers with dances and delight;
And there the snake throws her enamelled skin,
Weed wide enough to wrap a fairy in.

Bridal table canopy

Structural materials: birch trunks, curly willow, honey locust branches, and smilax vine wound down around birch trunks

Yet marked I where the bolt of Cupid fell:
It fell upon a little western flower,
Before milk-white, now purple with love’s wound,
And maidens call it, Love-in-idleness.

Some of the gorgeous materials used on the arbor: clematis, hanging amaranth, yarrow, nigella, viburnum, hydrangea, and more…

Things base and vile, holding no quantity,
Love can transpose to form and dignity.
Love looks not with the eyes, but with the mind,
And therefore is winged Cupid painted blind.

Marlene wraps the woodland cake with smilax vine, atop a tree trunk

What hempen home-spuns have we swaggering here,
So near the cradle of the fairy queen?

Centerpiece with pitcher plants, astilbe, fern, poppy, white scabiosa + seedpods, veronica, and chocolate cosmos

Nancy Saam tweaks the centerpieces

Pitcher plant, sarracenia – carnivorous!

Brenda trails smilax vine on the candelabras

What angel wakes me from my flowery bed?

Jane puts the finishing touches on her large cocktail arrangement

So we grew together,
Like to a double cherry, seeming parted,
But yet an union in partition;
Two lovely berries moulded on one stem;
So, with two seeming bodies, but one heart.


union league wedding

Last week’s wedding was a big affair – 200+ guests at the Union League in downtown Philadelphia, with “garden-style” flowers by Nancy Saam and our team.  Jane, Pat, Nancy, Chip and I prepped the day before.

Pat creates large centerpieces using spirea, peony and viburnum – gorgeous

Jane and I made some designs on 3-tiered silver trays.  First, we cut the Oasis down to size and secured it onto the trays with prongs (held with floral clay.)

Then we added greens like fatsia leaf, euphorbia, hosta, galax leaf, and then flowers like Tuberose.

Finished tray is dripping with flowers like calla lilies, pink garden roses, astilbe, and viburnum. Moss is packed into the holes to complete.  Oh and ‘Green Trick’ Dianthus!

Then Jane and I made a long design for the placecard table, using lots of greens like lemon leaf, huge hosta leaves, and solomon’s seal.  We also added hydrangea and ‘Festiva Maxima’ peonies, from – you guessed it! – A Peony Garden. This design will be finished on site.

Now, the day of the wedding!  The truck arrives, packed to the gills.  Everyone lends a hand unpacking.  It’s many, many trips up the small freight elevator and into the various rooms we’ll be working – the ceremony room, placecard table, cocktail area, and finally the reception area.

I spend most of my day in Lincoln Hall, where the reception is to be held.  We are creating an arbor of sorts out of birch. The structure is in place, and we begin by adding a layer of leafy branches.

Birch Structure is nailed together and strengthened with zip ties where branches meet, and c-clamps on the tables.

Cages filled with floral foam are zip-tied to the branches in the front, and we begin to fill them with viburnum.

Here Nancy shows us where she’d like to see more viburnum added.

Brenda does the lion’s share of the work on this structure, and I am her assistant, handing her branches, mopping up spills, sweeping up leaves as we go.  She has had 18 years of experience in the floral industry.  She spends most of the day on a ladder, and if I may be honest, totally kicks ass!  Unfortunately we were working so hard and moving so quickly most of the day that I never got a good picture of her!!

Brenda adds peonies and stock to our flower bower of power!

As Brenda puts the finishing touches on the arbor, I’m called away to do some cocktail area arrangements and to finish the long placecard table design that Jane and I began.  I replace a few wilted peonies, add viburnum, kiwi vine, and curly willow, plus a little astilbe for good measure.  Then the design is hung with votives.  This is all done with such astonishing speed, I think I forget to breathe at this point in the day.

Back in Lincoln Hall, things have reached a fevered pitch.  All the last minute touches are attended to – the candles lit, the tables set, our work buckets tucked away.

inside the birch / peony arbor – bridal table

Diane lighting candles – so Downton Abbey don’t you think??

One of Pat’s centerpieces in place

Our silver trays are also centerpieces

But the piece de resistance is the bridal table…fit for a royal party of elves and fairies…or Philadelphians.

Completed Arbor

All it needs are the newlyweds, and happy lords and ladies of the evening to sit under it, and fill the hall with their love and laughter.  When I got home to celebrate Julie’s birthday, I showed my dad a picture of this.  His response: “I guess we know Thanksgiving is going to be a lot more expensive this year!”  Dad, you’re right.  I think we need to create something like this arbor for our annual family gathering!  You’re on construction detail.  Thanks for all the great ideas, Nancy Saam!

day five – basic floral design I at longwood

Roman fresco with garland of laurel leaves, pomegranates, sheaths of wheat, and pine cones - photo courtesy of metmuseum.org

In today’s class we talked about garlands, which were popularized during the Greek and Roman Periods.   “Garland:  a wreath or festoon of flowers, leaves, or other material, worn for ornament as an honor or hung on something as a decoration.”  Personally, I like the idea of festooning long garlands all around the house and wearing a head garland at the same time.  In ancient Greece, head garlands (also called chaplets) were made of predominately foliage, and were awarded to honor athletes and heroes as symbols of allegiance and dedication.

Apollo crowned with a laurel wreath / photo courtesy of http://www.theoi.com

During the Roman period, garlands and wreaths were heavy and elaborate with fragrant and colorful blooms.  An abundance of lavish flowers was seen as a sign of opulence and wealth.  According to our teacher Jane Godshalk, there’s a story of one rich Roman Emperor who had a dinner party with a fragrant surprise: ceiling panels full of roses and other flowers. The idea was to let the canvases fall deliciously over the heads of his guests.  But it didn’t go like that –  a few of his guests were in fact smothered by his fabulous flowers.

party gone wrong at Elagabalus the Roman Emperor's place

There are a few ways of going about making a garland, and though we weren’t able to cover actually doing them all in this class, we were given a quick demo on how to make a wire garland, using pre-soaked Oasis blocks wrapped in plastic wrap and enclosed in chicken wire.  You just stick the materials into that, careful of the dripping.  A rope or twine based garland seems easy enough – just wire bundles of flowers/foliage around a stretch of rope or twine, making a loop with the twine on either end to hang it easily.  Work from one end to the middle, and then the other end to the middle. These are good for wrapping around pillars or poles, hanging swags on a table, or framing a window or door.

small garland of purple limonium, seeded eucalyptus, and bupleurum made by Jenny in class

And then there’s the table garland – essentially a wreath formed out of Oasis that you poke your plant materials into. Start with a basing of greens – in this case we used Ruscus, Myrtle, Galax and Seeded Eucalyptus.  Place them inside and out of the ring at varying angles.

my table garland/wreath in action - dinner courtesy of Dad and Julie with the wonderful company of Meg

Then add your main flowers – in this case spray roses and carnations.  Group them evenly throughout.  I used the seeded Eucalyptus as a filler flower really, but Limonium or I hate to say it Gypsophila also work well as a filler.  All of these items except the carnations (these were left over from another class) will dry pretty well and therefore this table garland borders on everlasting.

my first table garland/wreath - put a candle in the center and call it a day

All of these garlands are quite labor intensive and therefore should be done the day before an event.  That goes for head garlands too. In fact, I had just enough time in class to squeeze out a quickie for my niece June.

Niece June modeling the head garland I made

This was super fun to make and not too hard at all.  I measured out a piece of honeysuckle wire (just a wire with a brown wrapping, also comes in green,) making one end into a loop.  Then I made small bunches of daisy mums, Bupleurum, and Gypsophila or Baby’s Breath in my hand, which I then wired onto the main wire using bind wire.  Many mini bundles later the garland was filled, and I added some white ribbon on.

Head garland of Bupleurum, daisy mums and gypsophila on June

I really, really liked making the head garland.  I love the idea of wearable flowers – this might be a niche for me.  And when you put them on you feel like a total princess! (Or Greek goddess!)

Despite it's small size, I couldn't resist putting on the garland myself. photo courtesy of Juliet

wrist corsages

At falls flowers this week, I got a lesson in making wrist corsages.  There are a few different styles and ways of doing it, but as the request was for almost 40 simple white roses for a sorority gathering, we went with the simplest and fastest method – GLUE.  Gluing saves time when you have a bulk order, because the alternative is wiring and taping – a lesson I hope to get one day, too.  And this glue is like no other I’ve worked with – Oasis Florist Adhesive.  It’s a “fast-drying and waterproof liquid adhesive formulated for use with fresh flowers.” It won’t brown fresh flower petals, and it will hold up in cold storage. In other words, it’s a must-have for all you budding floral designers out there!

In making the wrist corsages, Peicha and I start by using well-hydrated roses, removing their sepals (the small spiky leaves at the base) and then trimming the stem down to near nothingness.  Shave the stem down with a knife so it’s as flat as possible.  Add a tiny blob of glue to both the bottom of the rose and the Elastic Wrist Corsage Band, making sure to spread the glue evenly.  Let the glue set for about 30 seconds and then carefully press the rose onto the band’s flat metal plate.  Earlier, we removed the little metal prongs that would normally fold over and enclose a bunch of wired flowers.  As with any glue, it’s better not to touch it with your fingers or you’ll be trying to get it off all day – this is especially true with this glue, though scrubbing with Lava soap does get it off pretty well.  Also – when working with this glue PLEASE choose a well-ventilated spot and take breaks to venture out into the fresh air or you will get silly like I did.

As far as wrist corsages go, I think there are a lot of possibilities out there on what you could do, and I think they are a great alternative for prom season.  Remember your date awkwardly trying to pin a corsage on your chest? This is so much easier.  And a wrist corsage doesn’t get in the way during the slow dance!  I really think we should all wear flowers a little more often, don’t you?

winter wedding

wedding cake

white hydrangea skirts the tiered cake

This week at the shop, we prepared for Saturday’s wedding, a floral event conceived back in June 2011.  The couple approached proprietor and lead designer Peicha Chang, asking for “bright” flowers within a certain budget.  Peicha met with them throughout the months to get to know their style, the colors they preferred, the color of the bridesmaids’ dresses, and the types of different floral selections they needed: from centerpieces to wrist corsages.  The week before the event, she purchased all the beautiful blooms for the big day.  On Thursday, she began making the centerpieces for the tables…starting with the greens (salaal and umbrella fern) as a base.

the stunning umbrella fern

After she was happy with the first centerpiece, using bright purples, dark pinks and solid reds coupled with light and dark greens; she cranked out the others (I think there were around 25.) Each centerpiece is slightly different when you look closer; some have darker tulips, some have hypericum berries, etc. But you’ll have to wait until they’re in their proper setting to really see them.  I watched her work, as miraculous creation took place, one beautiful arrangement after the next.

creating the centerpiece arrangements

ivy wrapped around the stems adds another layer of interest to the centerpieces...cool!

While Peicha did her thing, I was doing mine.  I was given a BIG job this day – making two wreaths of fresh white hydrangeas!  I really had a great time doing it.  Using a pre-made form filled with floral foam which had already been soaked, I cut down the hydrangea stems (my knife skills are getting better!) and poked each stem in, being careful to place the blooms in an alternating pattern.  You get big bang for your buck with these guys!

creating the hydrangea wreath

my first creation! thanks for trusting me with this, Peicha!

Okay so after the first one was done, then I did the second, and guess what, they were slightly different. So I had to go back to the first and press some blooms in a little farther to create a more uniform appearance.  While I was working, these wreaths were quietly dripping away – the reason behind doing this job a few days in advance of the big day.  You sure don’t want your product dripping onto wedding guests!

bouquets and personal flowers for bride's side- some wrapped in rosaries! beautiful!

Now for Saturday, the big day…I arrived at work very excited to see what was in store.  While Peicha finished the bouquets for the ladies, I was given a surprising task – delivering the personal flowers to the groom’s side of the family.  The groom was calm and happy as I showed him how to pin his flowers on.  Here, the best man models his boutinnière comprised of red ranunculus, waxflower and ivy.

the word boutinnière is french for "buttonhole" - ooh la la!

Back at the shop, my new colleague Emily packed up the centerpieces for delivery. Each vase is wrapped carefully in plastic air packets and put into a crate.

Then Peicha and I hit the road to deliver the bridal flowers.  Arriving at the Omni Hotel, everyone right down to the valet was happy to see us…well, maybe it was the flowers they were happy to see.   And after all her intense hours of labor, this is payoff day for Peicha – will the bride be happy? Will everything go off without a hitch?

elevator moment

Methinks the bride was more than happy.  Her exact words were “I’ve never seen more beautiful flowers.”  And Peicha and I both, upon leaving the bridal suite, began tearing up a little.  This is what it’s all about!

Next, we stopped off at the church to hang “my” wreaths on the front doors, and to add floral accents to the front pews meant for the bride and groom’s families.  (I had to do some guerilla bow-making on the steps of the church – thank God Peicha had taught me some rudimentary bow skills last Thursday!)

St Francis of Xavier - a beautiful church!

Alrighty, this day was moving right along! Let’s get going over to the Down Town Club to set up the flowers for the reception.

Jerome helps us - great guy with a great handshake

the Down Town club was founded in 1897 - i'm having a 'shining' moment

Peicha "fluffing" the centerpieces

Here they are in all their stunning glory! Amazing work, Peicha.

centerpiece in jewel tones: rose, anemone, waxflower, tulip, astrantia, umbrella fern

peony tulip centerstage

all white for the bridal table - gosh look at those anemones with dark purple centers!

I had such a great day – from witnessing Peicha’s grace under pressure and exceptional designing talent, to meeting all the ‘behind-the-scenes’ folks, and most importantly, seeing how flowers really touch the people whose event you’re involved in – I cherished every part of this new experience, and hope that there will be many more to follow.  Best wishes to the bride and groom!